Setup BlackBerry Z10 for Microsoft Exchange Server
When it is about business phones, nobody can beat the classy BlackBerrys. And living by their name, Research in Motion (RIM), the pioneers of BlackBerry is constantly under research to develop the best for their business phone users. BlackBerry Z10 is an outcome of that zealous effort and innovations. BlackBerry Z10 is the first of their phones to use their new operating system BlackBerry 10, which gives the phone a unique platform-wide flow interface, a new brainy keyboard, and a camera app that enables the user to fine tune the photos. The phone, following the footsteps of its predecessors, is also compatible with Microsoft’s Exchange Server, fulfilling the main need of a business user, i.e., access to Outlook emails. Adding a Microsoft Exchange Activesync email account to your Blackberry Z10 is very easy.
How to setup BlackBerry Z10 for Microsoft Exchange Server.
Following are the steps you can follow in order to sync your BlackBerry Z10 with Microsoft Exchange Server:
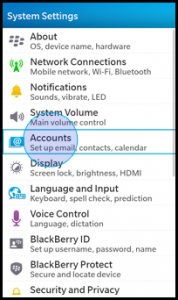
- Go to your Phone Settings.
- Select the Accounts option.
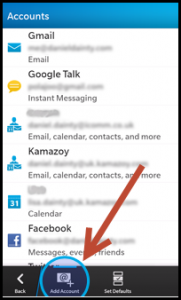
3. Click on Add account option at the bottom of the screen.
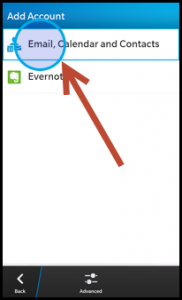
4. On the Add account screen, select Email, Calendar and Contacts option.
5. Here enter your email address.
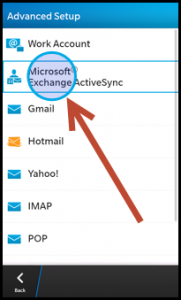
6. Further your device will search for the server details of your email address and will connect it accordingly. (Note: If your device fails to locate your server details, you can click the ‘Advanced’ option at the bottom of the screen and select the type of email account you are adding.
7. Further choose the Microsoft Exchange ActiveSync option.
8. Include the following details :
- Description: The name you want for your account.
- Domain: This is the network authentication realm.
- Username: This is typically the first name included in your email address before the @ character.
- Email address.
- Password.
- Server address.
- It is advisable to leave the rest of the settings as it is on the default mode.
9. Click on ‘Next’ option when done. Your device will check for the information and will synchronize with the Exchange account.


