Setup or Configure Samsung Galaxy S3 or S4 for Microsoft Exchange Server
The Samsung Galaxy series of phones has become one of the most sough-after Smartphones around the world since past few years. Its flagship Smartphones, comprising the new Samsung Galaxy S3 and S4, today stands shoulder-to-shoulder with top notch Smartphones such as Apple’s iPhone. Thus, it is quite natural for the Samsung series of phones, including the high-tech S3 and S4, to establish connectivity with the leading email hosting solution Microsoft Exchange Server. The protocol for interfacing with Microsoft Exchange is an industry standard and obviously very well established.
Following information will be required to set up ActiveSync:
- Username
- Email Address
- Password
- Domain Name
- Server Address
How to add ActiveSync® Account to Samsung Galaxy S3 and S4?
1. In the Home screen, Select Menu > Settings > Add account > Microsoft® Exchange ActiveSync.
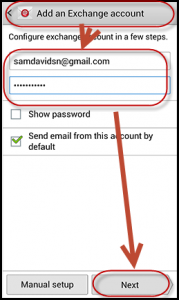
2. Add your Email address and Password. Check the “Send email from this account by default” box (Please note: this option will be available only if you have previously added one more email account) to set this as the default email account and then select Next.
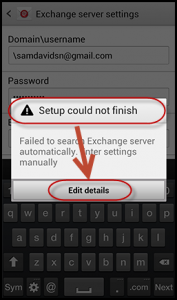
3. Your Samsung Galaxy S3/S4 will try to automatically search for the added details required to set up your account. If the phone becomes successful in doing so, then you will be directly taken to the 5th step of the process (find it below), otherwise you will get the “Setup could not finish” pop up. On the pop up, you will see the “Edit details” option. Just select that and manually enter the additional information.
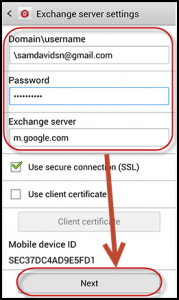
4. Validate whether the Exchange server settings are accurate, and further select the ‘Next’ option.
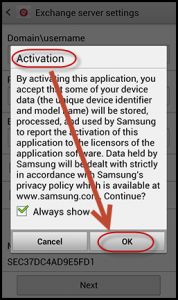
5. Glance through the Activation pop up. If you don’t to view this pop up again while setting up an ActiveSync account, don’t check the “Always show” box and click on the ‘OK’ button.
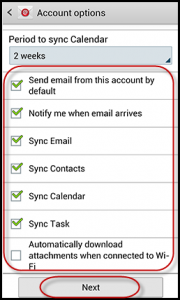
6. The “Account options” window will display which will show a list of ActiveSync options that you can choose from. (Note: Options may differ subject to the account type.)
Following are the options the Account will display for you:
- Send Email From This Account By Default: You can check this option in order to send every new email messages from this account by default.
- Notify Me When Email Arrives: You can check this box if you wish to get notification from your device while receiving new email messages.
- Sync Email: You can check this box if you wish to synchronize your email with your device.
- Sync Contacts: You can check this box in order to sync your contacts with your device.
- Sync Calendar: You can check this box in order to sync your calendar with your Samsung Galaxy S3 or S4 smartphones.
- Sync Task: You can sync your tasks to your phone by checking this box.
7. Finally post checking the boxes of your choice from the Account options, scroll to the bottom and click on the ‘Next’ option.
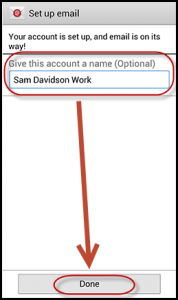
8. When you click on Next option, you will be taken to set up email screen. Here, enter an account name. (Note: This will allow you to easily recognize this account if you add other accounts to your phone.
9. Finally hit the ‘Done’ button.
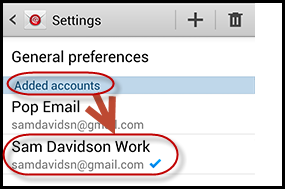
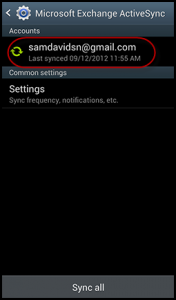
10. Further you can edit your Email Account Settings. For that, from the Home screen, select the Menu key > Settings > Microsoft Exchange ActiveSync and then select your account name. Select Settings to have a view of the General preferences and the Added accounts settings.
11. Another way to access the settings is from Apps > Email > Menu > Settings.
12. Choose your Account name under the Added accounts section for the following options:
Note: Options may differ based on the account type you are viewing.
- Account name shows the account display name.
- Signature is the name tag added to your outgoing message automatically for the account you are logged in.
- You can select the Signature to edit the signature that you will send with the mail.
- Default account is the account that you assign as default for outgoing emails.
- Forward with files: This feature enables you to retain any attachments while forwarding a message.
- Show images: The show images option displays all images while you view mails.
- Period to sync email: This option describes the sync range your phone should receive and save messages for.
- Empty server trash: This option remotely deletes your account’s server scrap.
- Sync schedule: Sync schedule feature enables you to outline your email sync schedule.
- Folder sync settings: With folder sync, you can sync the available folders in your account.
- Out-of-office settings: With this option you can automatically set out-of-office replies to incoming mails.
- Size to retrieve emails: You can define the incoming email size your phone is allowed to download automatically.
- Similarly you can set period to sync calendar. You can sync email, contacts, calendar, tasks, set security options, select ringtones for your messages, set email alerts and do more.
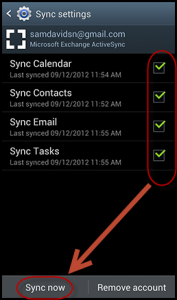
Synchronizing Your Microsoft Exchange ActiveSync Account
You can modify your Exchange ActiveSync account settings to alter the content synchronized to your phone.
- From the Main page, select Menu > Settings > Microsoft Exchange ActiveSync and choose your account name.
- Check or uncheck the boxes you want to synchronize. Select the Sync option when you choose your desired content.


